
I made a tent that at the same time works as a backpack, the “motenda”. This was the design process.
1. A light backpack and tarps?
Back from hiking the Pyrenees with a 2,250 g backpack and a 1,600 g tent I started looking for lighter equipment. There were ultralight backpacks and some people used tarps instead of tents (floor and cover). But backpacks weighed less thanks to thin and light fabrics that were easy to tear in case of touching a tree branch. However, this backpack would contain a resistant floor tarp! This was a contradiction, the stronger fabric should be the one outside.
2. Tarp and Rain Poncho?
I thought I could use the floor to wrap the contents of the backpack and the use the rain poncho as cover to form a shelter. I liked the idea because it removed the backpack and I only had to carry the floor as wrapper and a rain poncho. But this solution was not feasible as hiking the Pyrenees means cold nights, even in summer. Sometimes it rains, or there are no convenient trees to attach the ropes. I went back to the idea of a traditional tent. Perhaps I could assemble the floor and the rain poncho to form a proper tent.

3. The tent is the backpack!
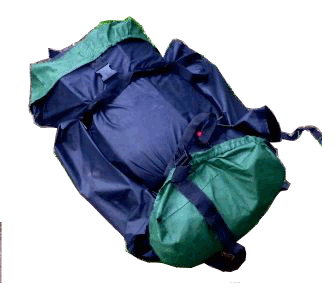
I studied if I could join the floor to the cover with zippers or Velcro. But it was complicated, the size of the cover did not correspond with a rain poncho, it would be painstaking to attach every time I was going to assemble the tent. Should I cut an opening through the floor fabric to access the backpack? If I didn’t wrap things well, could things drop? The eureka moment was when I realised that the tent could work as a container and become a backpack when folded. Nothing could drop and I could use the tent door to access the inside.
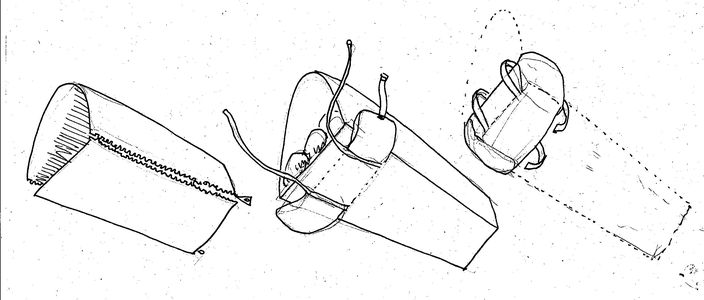
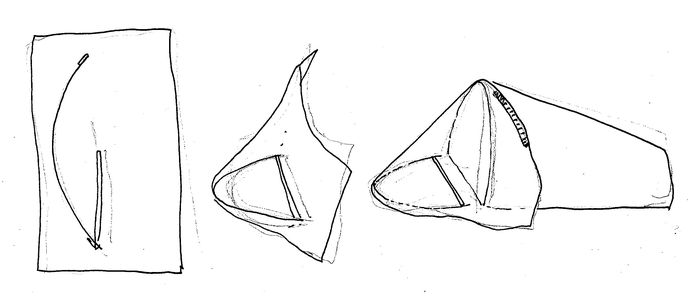
4. Studying the folding and straps, integrated mat
Now I had to find a way to fold the tent in order to become a box with a 25×35 cm base and 60 cm height. I had seen that some backpacks incorporated the mat and also that some mat models were shorter to save weight. I picked up the idea, the mat would be integrated with the tent floor and when folded, the box would be sturdier.
Next step, find a way to hold the wrapped tent between two «lids», and study how to attach the necessary straps without interfering with the mat.
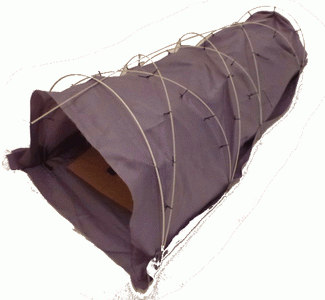
5. Structure
How would the tent stand up? My former tent had two crossed arches freestanding, one arch at the end, and ropes front and back. I wanted to have a freestanding structure, with no ropes. While exploring materials in a kite shop I discovered twisted fiberglass rods, that can recover its shape after being folded. Ithe cross with to arches was selfstanding I could support the whole tent with three crosses. I built a model with three crosses and an axis, and the result was ok, very light but resilient.
6. Rain poncho / vestibule
I still wanted to have a vestibule like the one in my old tent, and intended to do it with the rain poncho. But it couldn’t find a way to adapt its shape neither to hold it without ropes. Finally I tried to use a rod as a guide for the base, tightened with a strap. The other part was to be hold with Velcro to the tent cover. The pegs are not compulsory but I decided to include 5, 4 for the tent and one for the vestibule.
DOWN To WORK!
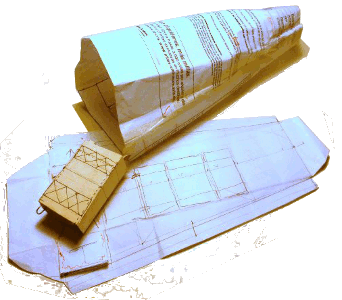
The stage of drawing and modeling finished, I ordered the materials, bought a sewing machine and and there followed months of work, full of mistakes and corrections, some of them forgivable, many completely stupid. But eventually the 1,850 g tent-backpack was finished. I show the result in this page with an imperfect guide for those who might like to build their own.
